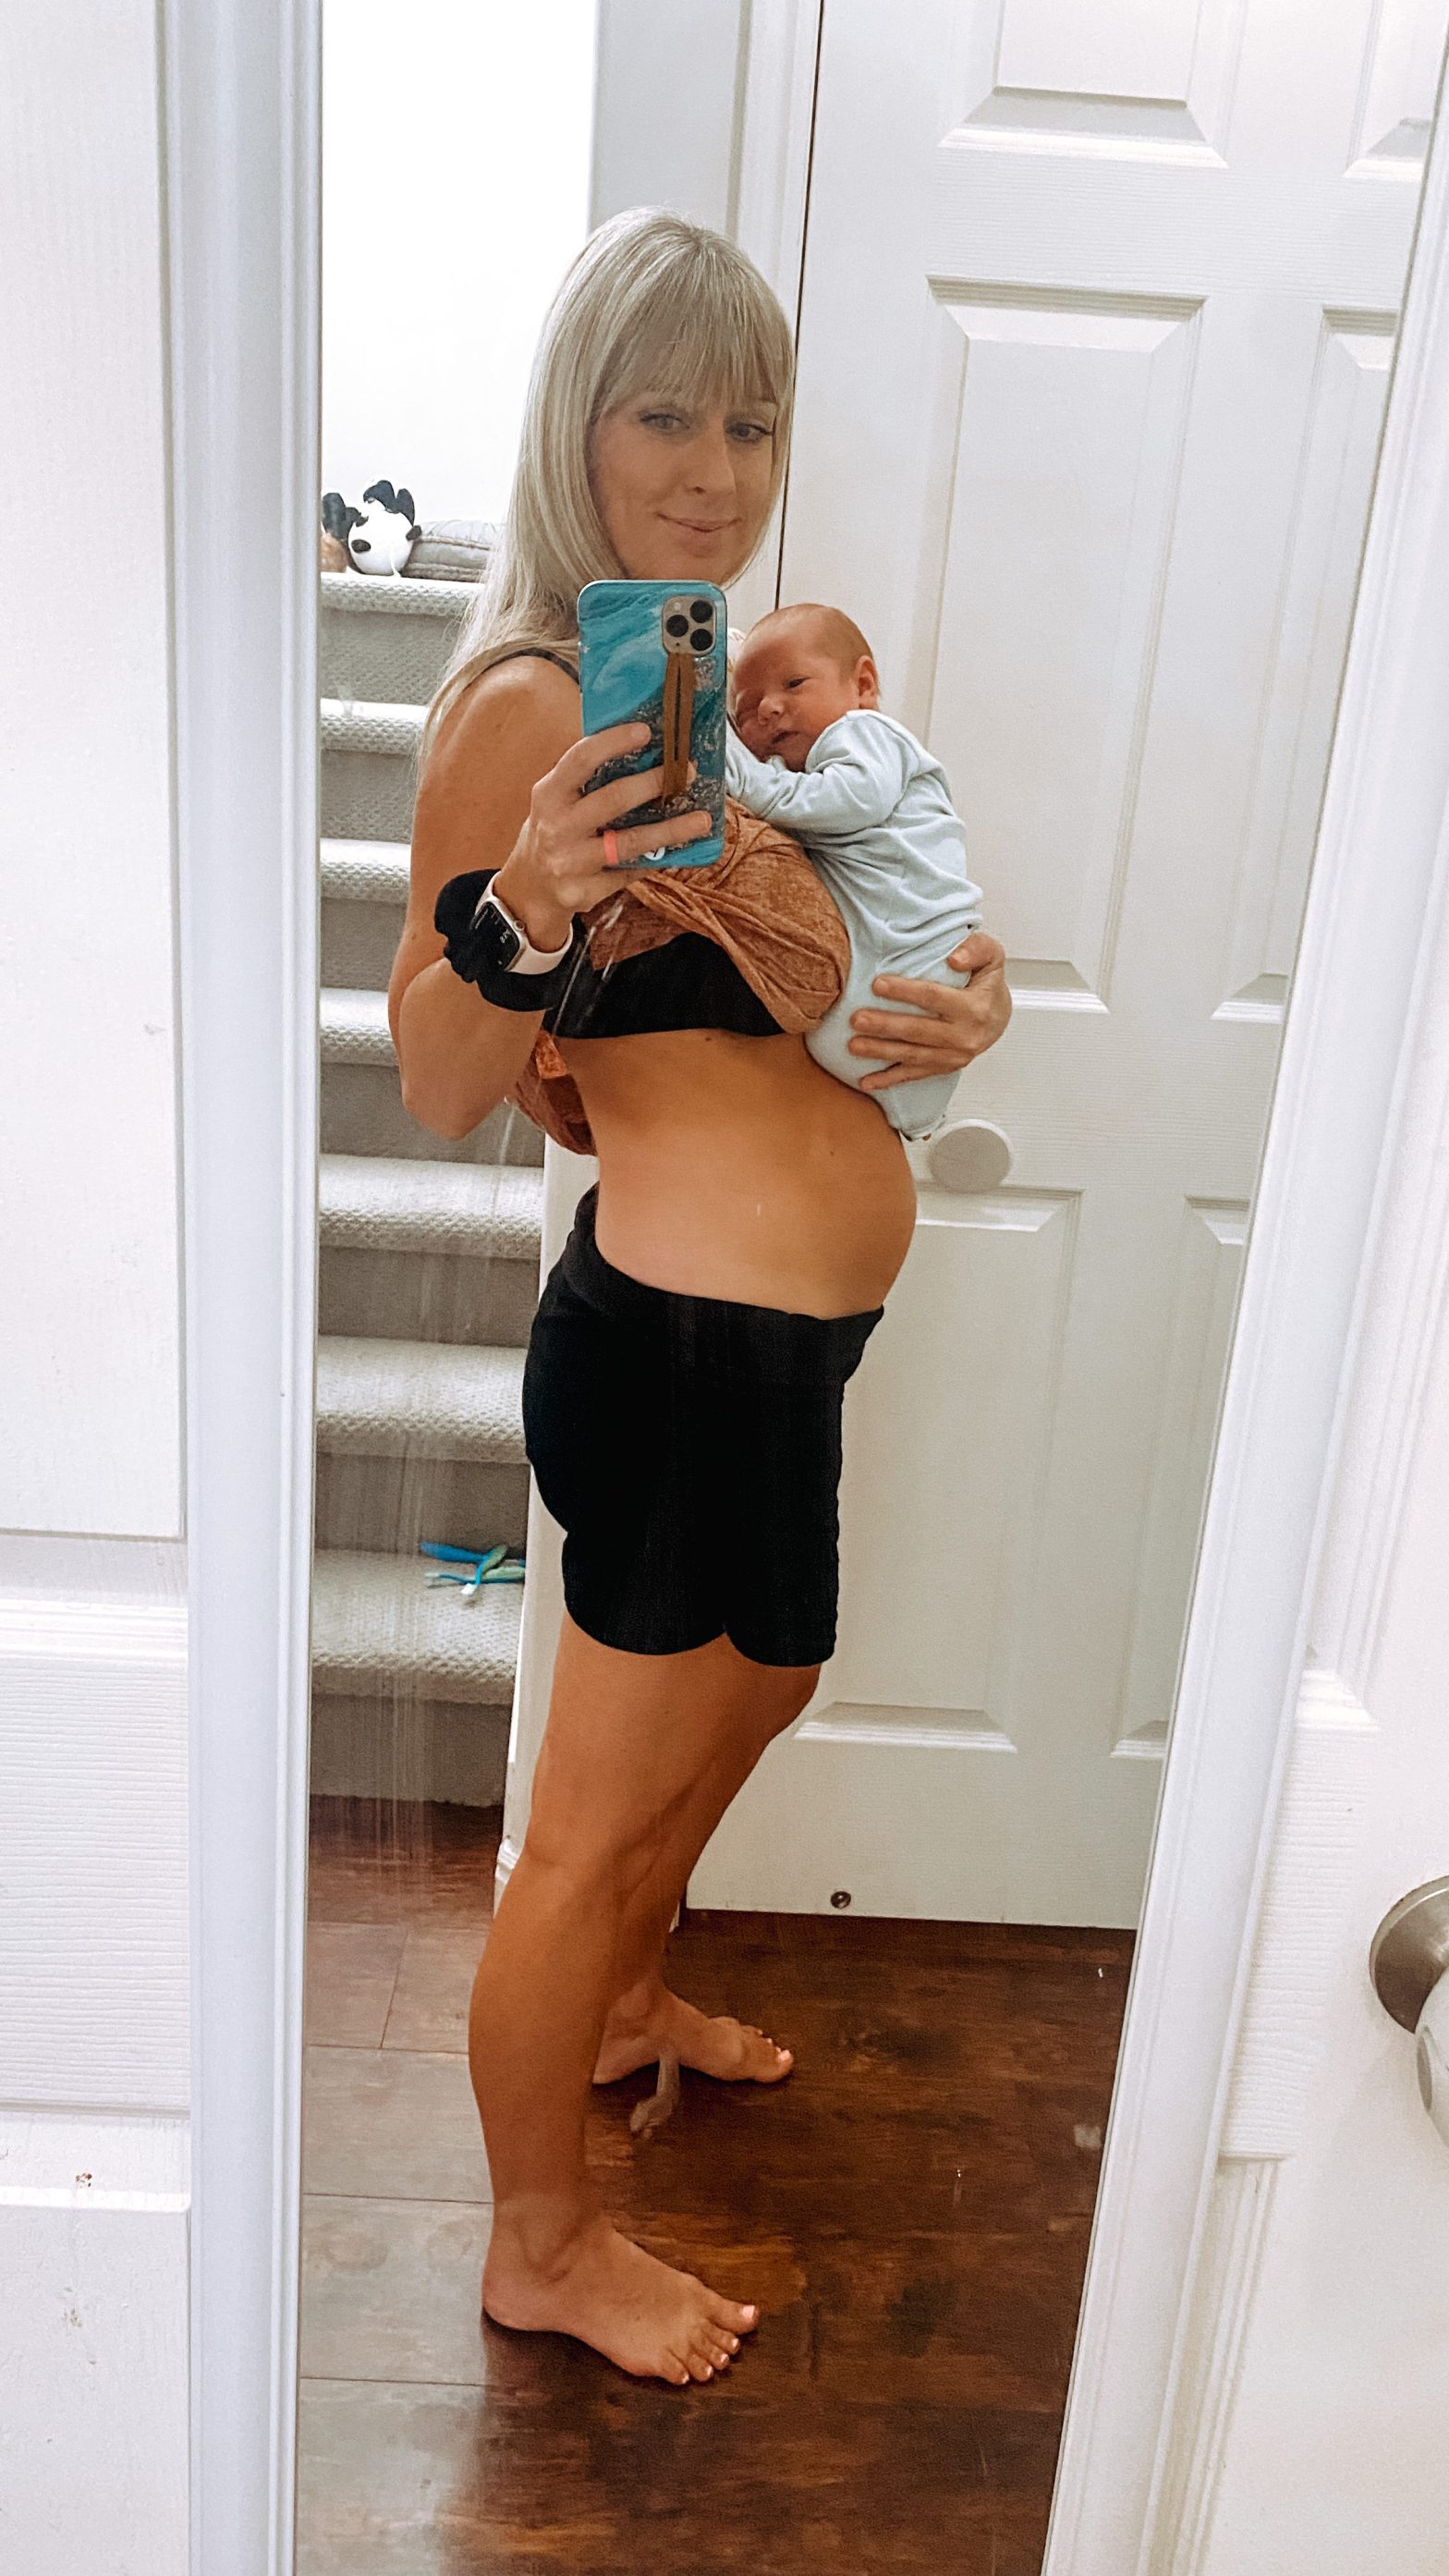
Your body goes through a lot of changes during pregnancy and postpartum recovery–especially your core. During pregnancy, your abdominal muscles lengthen and stretch to make room for your growing baby. Your pelvic floor may weaken as the weight of your growing baby presses down on it.
After birth, you might find it harder to engage and connect to your core. You might be dealing with diastasis recti (the separation of your “six pack muscles”), weak pelvic floor, tight pelvic floor, incontinence, and back pain.
None of these things sound very fun, but the good news is, they are all fixable!
In this article, I’m going to walk you through, step by step, how to resolve these issues so your core is working optimally once you’re able to get back into traditional exercise.
Please note that I am not a doctor and I’m not your doctor. These are general guidelines. I highly recommend that you find a pelvic floor physical therapist near you. I started going to one around 32 weeks pregnant and started again at 6 weeks postpartum. They can give you more specific guidance based on what your body needs since every individual, pregnancy, and delivery is different.
Alright, let’s jump in!
Step 1: Fix your breathing
You can begin breathing drills immediately postpartum from your hospital bed if you wanted to! I know it sounds funny to learn how to breathe, obviously you know how to breathe if you’re alive, but we’re going to learn how to breath with your core!
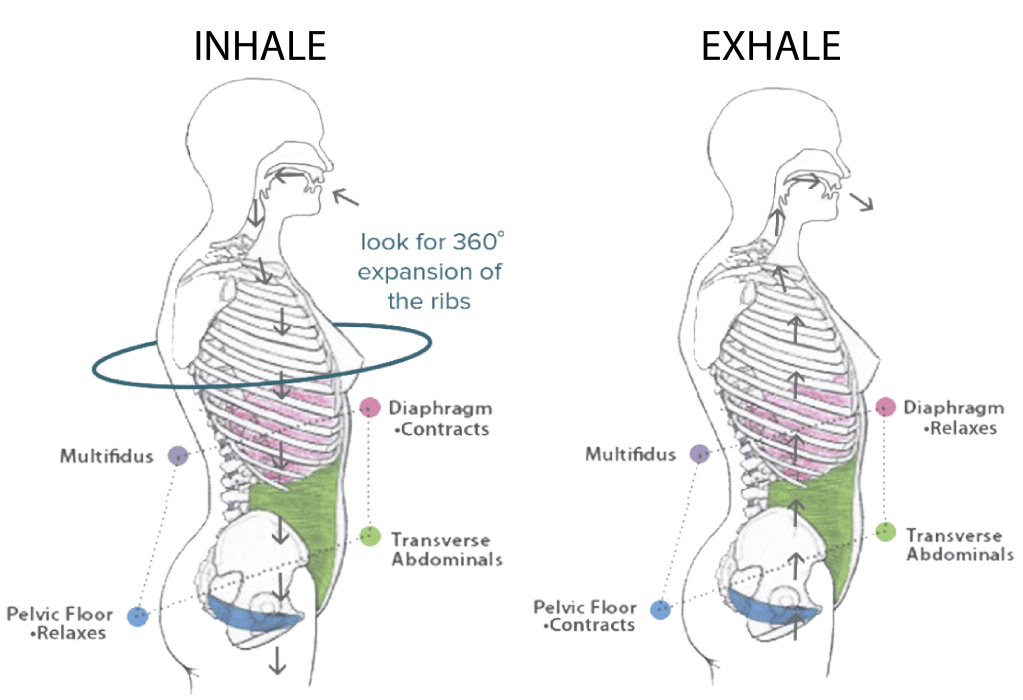
Your core is made of of 4 components: diaphragm, pelvic floor, transverse abdominis (abdominals), and multifidus (back). The balance of these muscle groups is what gives us core stability.
These muscles need to work together for you to effectively move and breathe. After having your baby, you might notice your only breathing into your belly, but in order to incorporate your core, you want to do a full 360-degree breath.
This means that as you inhale, you’re breathing into you ribs, belly, chest, and back.
Here’s how to do it:
- You can do this either seated or lying down.
- Place your hands around your ribcage with your thumb towards your back
- Inhale, breathing into your ribs and back – you should feel your ribs expand as you do this. If you don’t feel that expansion, try slightly rounding your back.
- You can also but an exercise band around your ribcage to feel that expansion all around.
- As you exhale, you’re going to breathe out from the bottom up – starting from your pelvic floor, all the way up your abdominals.
Step 2: Learn how to relax and contract your pelvic floor
Before we get into the deep core muscles, let’s quickly review the pelvic floor.
In women, the pelvic floor is a group of muscles and ligaments that support the bladder, uterus, and bowel. It’s kind of like a sling or hammock, holding everything up.
You can also think of it like a diamond. One point of the diamond is the pubic symphysis (pubic bone) and the opposite end is the Coccyx (end of the tailbone). You have your sit bones on either side.

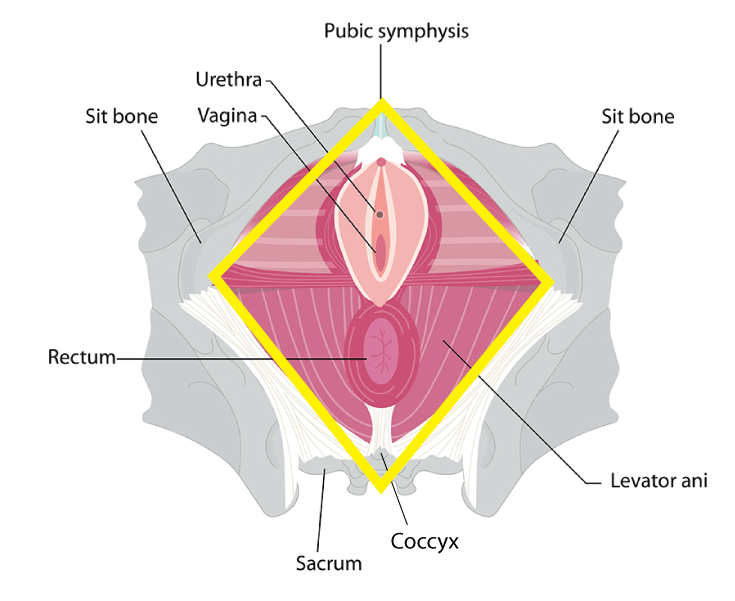
When you contract your pelvic floor muscles, your internal organs are lifted and the entrance to your anus, vagina, and urethra tighten.
This is different from a kegel. A kegel can open/close the urethra, vagina, anus, but it does not lift the pelvic floor.
One way to locate your pelvic floor is to pretend you’re peeing and the pretend to stop your stream of urine. It is not recommended to actually do this as it can lead to a UTI.
You can also sit on a yoga block or even your hand and practice relaxing your pelvic floor and lifting it – you should be able to feel it.
Immediately postpartum, you can practice doing a very gentle pelvic floor contraction as you practice your breathing. If it feels like too much, you can wait a week and just practice breathing.
As you inhale, your diaphragm contracts and your pelvic floor relaxes. As you exhale, your diaphragm relaxes and your pelvic floor contracts.
The next step is to bring your core into the equation.
Step 3: Activate your transverse abdominis (TA) muscles
Your abdominal wall stretches and lengthens during pregnancy to accommodate for your growing baby. This makes activating your deep core more difficult.
The deepest core muscles are your transverse abdominis (TA). They’re located behind you 6-pack muscles (rectus abdominis) and wrap around your sides and attach to your spine. They are sometimes referred to as your corset muscles.
The muscle fibers run horizontally, so when the muscles contract, the motion they create pulls inward towards the center line of your body. As a result, activating the TA helps pull everything in like Spanx and also helps with core stability.
Have you ever complained or heard women complain about having a “mom pooch”? Want to know how to get rid of it and reduce the size of your belly? Activating your TA and doing exercises to heal your diastasis recti will literally act like Spanx and tighten up your abs. When your TA is weakened, it can cause a pooch.
Here’s how you can feel your TA working:
- Start by lying on your back with your knees bent, feet resting on the floor. Find the tip of your hip bone with your fingers and then travel 1 inch toward your belly button and 1 inch down. This is the only place you can feel your TA contract.
- Inhale breathing into your ribs, back, and belly (360 breath)
- Exhale, lift your pelvic floor up and tighten your abdominals by pulling your navel in and up toward your spine. You should feel your muscles contract under your fingers.
Here are some helpful cues to help you activate your pelvic floor and TA:
- Make an audible sound – “shhhhhhhhh”
- Imagine you’re bringing your hip bones together
- Imagine you’re zipping up a tight jacket or corset
- Imagine you’re putting on a tight pair of jeans
- Squeeze a pilates ball between your legs to help activate your pelvic floor
Exercises:
I have a highlight bubble on my instagram including the workouts I did weeks 1-5. I’ve also linked them here for easy access. You can see that I started with breathing exercises and gradually moved into core stability exercises.
Here are some additional short videos of exercises you can jump around to:
Breathing Exercises:
Start with practicing laying down and as you get stronger, try doing different positions from sitting, to side breathing, back breathing, standing, and quadruped:
Core Stability Exercises:
Step 4: Mobility
Why focus on mobility?
During early postpartum you find yourself stuck in one position for long periods of time as you’re feeding your baby, holding your baby, laying in bed, sitting, etc. This can cause some tightness and discomfort in your neck, back, and chest.
Also, your limited back mobility might be holding your pelvic floor function back. Your diaphragm and pelvic floor work together as we learned above. The diaphragm is shaped like an umbrella.
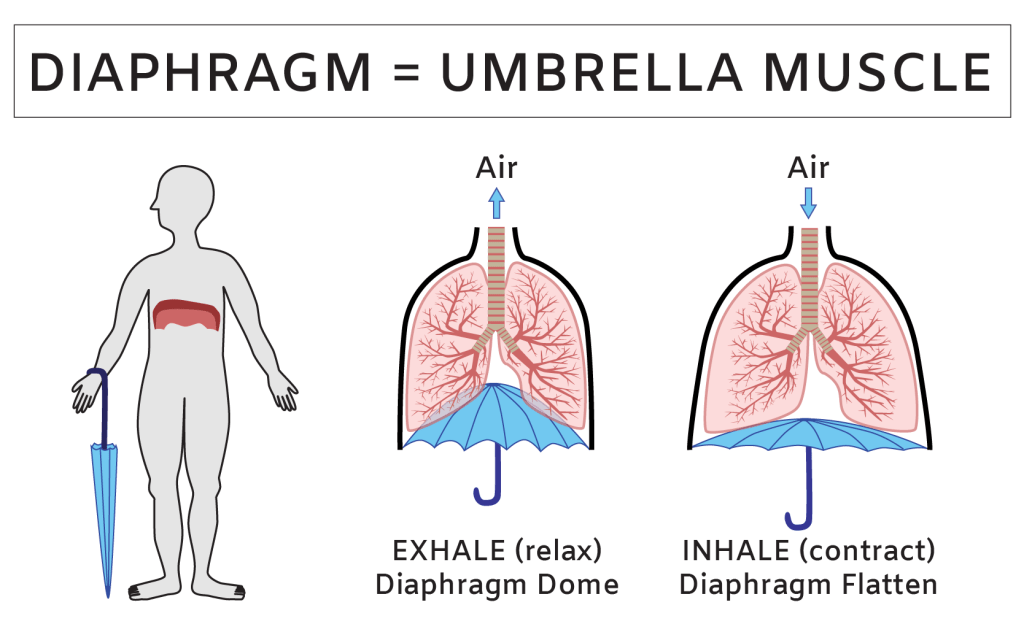
When you have limited back and rib mobility, it limits the ability of the diaphragm to expand into 360 degrees. If the diaphragm isn’t able to fully expand, it will divert movements and pressure to the belly and pelvic floor.
Increased pressure on your belly and pelvic floor can result in or worsen rib flare, leaking, and prolapse.
This is why adding in some mobility will be beneficial for you! It will relieve some discomfort and support overall healing.
Thoracic Mobility
You want your spine to be able to move really well, especially the upper spine which is meant to have a lot of rotational and movement capability. But when you’re stuck in positions for long periods of time, it can cause some stiffness in your upper back, neck, and chest.
Chest Mobility
Chest mobility is important because as you’re nursing or holding your baby, you get stuck in a hunched over position, so you want to open up you chest and give it a nice stretch.
Exercises
Incorporate 1-3 of these exercises daily. The great thing is that a lot of these can be done in bed as you’re resting!
Step 5: Walking
Walking will be so good for you postpartum-physically, mentally, and emotionally. Getting outside for just a little bit each day and moving can help reduce depression and anxiety which are both very common postpartum.

You want to ease into it since your body did just go through a lot. If you notice increased bleeding, heaviness, or any other worsened symptoms during or after walking, ease back or stop.
Again, you’re gradually getting back into walking, even if you were walking 60 minutes every day up until labor and delivery. You don’t want to jump right back into that.
Here’s an example of what you can do weeks 1-5:
WEEK 1:
| DAY 1 | walk for 3 minutes, rest for 2 minutes, walk for 3 minutes. Repeat twice daily. |
| DAY 2 | walk for 4 minutes, rest for 2 minutes, walk for 3 minutes. Repeat twice daily. |
| DAY 3 | walk for 5 minutes, rest for 2 minutes, walk for 4 minutes. Repeat twice daily. |
| DAY 4 | walk for 5 minutes, rest for a minutes, walk for 5 minutes. Repeat twice daily. |
| DAY 5 | walk for 6 minutes, rest for 1 minutes, walk for 6 minutes. Repeat twice daily. |
| DAY 6 | walk for 7 minutes, rest for 1 minutes, walk for 7 minutes. Repeat twice daily. |
| DAY 7 | walk for 8 minutes, rest for 1 minutes, walk for 8 minutes. Repeat twice daily. |
WEEK 2:
| DAY 1 | 9 minute walk, twice daily |
| DAY 2 | 10 minute walk, twice daily |
| DAY 3 | 12 minute walk, twice daily |
| DAY 4 | 15 minute walk, twice daily |
| DAY 5 | 10 minute walk, 2 minute brisk walk, 6 minute walk |
| DAY 6 | 10 minute walk, 3 minute brisk walk, 8 minute walk |
| DAY 7 | 15 minute walk, 5 minute brisk walk |
WEEK 3:
| DAY 1 | 10 minute walk, twice daily |
| DAY 2 | 12 minute walk, twice daily |
| DAY 3 | 15 minute walk, twice daily |
| DAY 4 | 10 minute walk, 2 minute brisk walk, 6 minute walk |
| DAY 5 | 10 minute walk, 3 minute brisk walk, 8 minute walk |
| DAY 6 | 15 minute walk, 5 minute brisk walk |
| DAY 7 | 12 minute walk, 5 minute brisk walk, 5 minute walk |
WEEK 4:
| DAY 1 | walk for 20 minutes |
| DAY 2 | walk for 10 minutes / 3 minute brisk walk / walk for 5 minutes |
| DAY 3 | walk for 30 minutes |
| DAY 4 | walk for 15 minutes / 4 minute brisk walk / walk for 4 minutes / 4 minute brisk walk / walk for 4 minutes |
| DAY 5 | walk for 30 minutes |
| DAY 6 | walk for 10 minutes / 4 minute brisk walk / walk for 6 minutes / 4 minutes brisk walk / walk for 6 minutes |
| DAY 7 | walk for 30 minutes |
WEEK 5:
| DAY 1 | walk for 20 minutes |
| DAY 2 | walk for 10 minutes / 2 minute brisk walk / walk for 6 minutes / 3 minute brisk walk / walk for 5 minutes |
| DAY 3 | walk for 30 minutes |
| DAY 4 | walk for 15 minutes / 3 minute brisk walk / walk for 5 minutes / 4 minute brisk walk / walk for 4 minutes |
| DAY 5 | walk for 30 minutes |
| DAY 6 | walk for 10 minutes / 4 minute brisk walk / walk for 6 minutes / 4 minute brisk walk / walk for 4 minutes |
| DAY 7 | walk for 30 minutes |
Takeaway
Following these steps will help get your body ready for more intense exercise farther down the road. In the U.S. your doctor typically clears you for “normal” exercise after your 6 week check-up if everything looks good. My doctor told me that I can do anything and everything I was doing prior to pregnancy.
Keep in mind, that doesn’t mean you should jump back into exercise with the same intensity, frequency, and duration. For example, with my first pregnancy, I had just done a marathon before getting pregnant. With my second, I had just done an Ironman before. Prior to my 3rd and 4th, I was lifting heavy weights and doing pretty intense exercise. I didn’t start running 20-30 miles a week once I was cleared.
You’ll want to gradually return to exercise almost like you’re a beginner. Get your body used to those movements again. Work on your form and from there continue to focus on getting stronger by progressive overload.
Also, if you’re wondering when you can get back to running or high impact exercise, I have a very detailed article all about this HERE.
I hope you found this helpful! If you did, please share with a friend. Comment with any questions or email me at: christyewingfitness@gmail.com
-Christy
